
Microsoft’s Polyglot Notebooks are modeled on the interactive Jupyter Notebooks, but are .NET-centric. This article provides a practical introduction to the Polyglot Notebooks and describes, using an example, its basic concepts such as setup, using different programming languages, sharing variables, and displaying results. Restrictions in use and further topics are also discussed.
Advertisement
What are Polyglot Notebooks?
Polyglot Notebooks allow users to enrich code with documentation (in Markdown format), output and visualize the results. The code blocks can be executed individually directly from the notebook and even combined with each other. In contrast to those commonly used for Python Jupyter Notebooks they are designed to run multiple languages within one notebook.
This means that Polyglot notebooks offer a variety of possible applications in software development:
- You can generate interactive reports to quickly output, analyze, and even visualize data.
- The lightweight combination of different programming languages allows prototypes and proof-of-concepts to be implemented quickly.
- Frequently needed scripts can be stored including documentation, for example for onboarding new employees.

Arthur Grot is a software developer at AIT GmbH & Co. KG. He helps transform his customers’ visions into innovative cloud and IoT software solutions using .NET and Azure technologies.


Dr. Eike M. Hirdes is Azure DevOps Enabler at AIT GmbH & Co. KG. He advises companies in the areas of agile processes, automation and administration, mainly in the area of Azure DevOps. As the author of the AIT Tech Talk and Azure DevOps Nugget blog series, he regularly publishes articles on the AIT Blog.
Setting up Polyglot in VS Code
To use Polyglot Notebooks, you must first install the extension in the source code editor Visual Studio Code (VS Code). This requires at least that .NET SDK 7.0 as well as the Polyglot Notebooks Extension from the Visual Studio Marketplace. The extension also installs automatically required Jupyter Extensions.
After installing the required dependencies, you can use the command palette in VS Code (Ctrl+Shift+P) and the command “Polyglot Notebook: Create default notebook” to create a notebook. In this example, the .dib format is initially selected. An explanation of the different file formats with their advantages and disadvantages will follow later. After selecting the format, a notebook opens with “.NET Interactive” as the selected kernel (Figure 1). The kernel is a service running in the background that executes the code from the notebook and returns the result as output. Each language has its own subkernel that is responsible for executing the respective language.
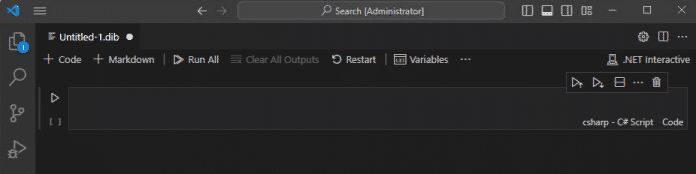
Newly created Polyglot Notebook in VS Code (Fig. 1)
Overview of Polyglot
The header bar not only shows the kernel, but also allows you to create additional code and Markdown cells. A cell is a structural unit in the notebook that contains either code from a specific language or Markdown. This makes it possible to write code and Markdown documentation alternately (Figure 2).
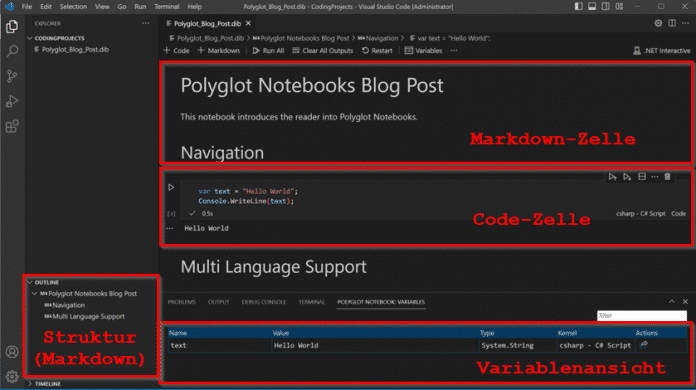
Polyglot notebook overview (Fig. 2)
The Run All command runs all cells in the notebook one after the other and displays the output. If problems occur while running and the kernel gets into an incorrect state due to an error, you can restart it. In the “Variables” menu you can activate the view with which all variables in the kernel can be viewed. Each code cell can also be executed individually using the “Play” symbol (▷).
Polyglot’s multi-language support currently includes the following programming and markup languages: C#, F#, PowerShell, JavaScript, SQL, KQL, HTML, Mermaid, Python and R. VS Code offers syntax highlighting, code autocompletion and other features for the languages at. Since December 2023, Polylgot’s HTTP protocol has also been supported, which means that HTTP requests can be sent directly from notebooks and the responses can be displayed.
Polyglot Notebooks explained using an example
An example created from scratch is used to demonstrate the features of Polyglot Notebooks. The initial situation is to quickly find out which customers have bought a particular product for a recall campaign. This data is stored in an SQL database. The SQL connection string required for this should be created in the first step and the access data requested. The next step is to establish a connection to the database and then retrieve the required data. In the final step, the data is displayed as a diagram in order to quickly see which customer is affected and to what extent.
The example shows how different languages and technologies (Polyglot Magic Commands, C#, SQL and Mermaid, which creates graphics from Markdown) can be used in a notebook and how they interact with each other. Magic Commands are special commands for Polyglot Notebooks that make it possible to execute code in other languages within a code cell or to control the notebook environment, for example to set variables.
Create the SQL connection string – process user input and variables
After Polyglot is set up, the connection string for the SQL database is created. This requires four parameters: the URL of the SQL server, the name of the database, a username and the password. The first two parameters can be permanently defined, the last two should be entered by users.
Using Markdown, both the entire notebook and individual code cells can be explained. For this connection string, variables should be firmly defined, but users should also be asked for access data. The following cell in Markdown format is for documentation and instructions:
## Create SQL Connection String
Run the following cell to create a sql connection string.
You will be prompted to input username and password.
Next, create a C# cell to contain the URL of the SQL server (serverUrl) and the name of the database (databaseName) to be defined as variables. The username (username) and the password (password) should be queried. The implementation for the query with Polyglot Magic Commands can be found in Listing 1. After calling the Magic Commands in the C# cell, the created variables can be used in the C# kernel.
// Fetch user input with magic commands
var serverUrl = "polyglot.database.windows.net";
var databaseName = " polyglot";

#!set --value @input:"Please provide a username" --name username
#!set --value @password:"Please provide a password" --name password
Listing 1: Querying user data using Magic Commands in a C# cell
If you would rather implement this entirely in C#, you must first integrate the Microsoft.DotNet.Interactive library, here as a NuGet package. The C# alternative can be seen in Listing 2.
// Fetch user input with C#
using Microsoft.DotNet.Interactive;

var serverUrl = "polyglot.database.windows.net";
var databaseName = "polyglot";

var username = await Kernel.GetInputAsync("Please provide a username");
var password = await Kernel.GetPasswordAsync("Please provide a password");
LIsting 2: Query user data in a C# cell
Both types of input support “Input” and “Password”. With “Input” the input is displayed in plain text, with “Password” it is masked. Attention: Only the password input is masked, the content is visible in Polyglot’s variable view (Figure 3).
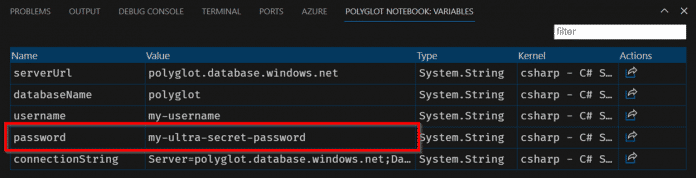
Danger! Queried passwords are visible in the variable view (Fig. 3).
The SQL connection string is composed of the previously defined variables:
string connectionString = $"Server={serverUrl};Database={databaseName}; User
Id='{username}';Password='{password}';Persist Security Info=true;Integrated Security=false;";