
Whether you’re traveling abroad and trying to avoid roaming charges, or you’re simply looking for a better way to manage your work-life balance, setting up a second line on your iPhone is a great way to help you keep everything separate.
This capability first arrived with the iPhone XS and iPhone XR in 2018, although it wasn’t obvious, since unless you lived in China, the iPhone didn’t offer another slot for an extra SIM card. Instead, you had to set up the second line using an eSIM. While eSIM technology isn’t entirely new — Apple has been using it with the iPad since 2016 — it’s taken mobile carriers a bit more time to catch up.
The good news, however, is that now you can get an eSIM from just about any carrier in North America — and quite a few elsewhere in the world, too. This makes it a cinch to get a second line on your iPhone, whether that’s only temporarily for a short trip, or you’re looking to set up a second line for business purposes.
While getting an eSIM provides the most integrated way to add an actual second line to your iPhone, since this can provide not only voice services, but cellular data too, it’s not the only way to go. If you just want an extra number for voice calls, several apps are available that are easy to get started with. Just be aware that these all require a data connection, either over Wi-Fi or your existing cellular plan. These are basically VoIP services, rather than a true second line.
Jesse Hollington / Digital Trends
How to obtain an eSIM for your iPhone
The first thing you’ll need to do is make sure that the line you want to set up is on a carrier that supports eSIM technology. Apple offers a helpful list, but it’s always a good idea to call your mobile provider’s customer service department just to be certain.
Even though an eSIM doesn’t require a physical SIM card, you’ll still need some information from the mobile operator that you want to get set up on. This is normally a QR code you can scan with your iPhone camera, but sadly many carriers still provide this code on paper. If that’s the case, you may still need to visit a retail store or wait for it to arrive in the mail.
The good news is that this is quickly changing as eSIM technology becomes more popular. Verizon can now activate an eSIM for you over the phone, while T-Mobile goes so far as to offer an app to provide a hassle-free way for prepaid customers to activate an eSIM.
If you’re setting up an eSIM account online, your carrier will likely ask you to provide a few pieces of information from your iPhone, including the IMEI2 and EID numbers. Here’s how to find them.
Step 1: On your iPhone, open the Settings app.
Step 2: Tap General.
Step 3: Tap About. Your EID can be found in the section that includes your Wi-Fi Address and Bluetooth Address. Your IMEI2 will be further down, below the information for your current carrier.
Step 4: You can copy either of these numbers to the clipboard to allow you to easily paste them into an email, text message, or online form. To do this, tap and hold on the field until the Copy button appears, and tap on it.

Jesse Hollington / Digital Trends
How to set up a second line with an eSIM QR code
Once you’ve set up your eSIM account with your carrier, they should provide you with a QR code that you can scan to add the new line to your iPhone. Note that if you’ve received your eSIM QR code electronically, you’ll need a second screen such as your Mac, PC, or tablet to display it on, as it has to be scanned with your iPhone camera. Here’s where to go to do that:
Step 1: On your iPhone, open the Settings app.
Step 2: Tap Cellular. You’ll see your cellular data settings for your current plan.
Step 3: Tap the Add Cellular Plan button below this.
Step 4: The iPhone camera will activate on the next screen. Position your QR code in the frame and hold it there for a second or two. If you were given a series of written codes instead of a QR code, you can tap Enter Details Manually at the bottom of the screen to key in this information.
Step 5: Once your iPhone detects the QR code, it should automatically continue to the next screen, informing you that a new cellular plan from your carrier is ready to be added to your iPhone.
Step 6: Tap Add Cellular Plan to confirm that you want to continue.
Step 7: On the next screen, you’ll be asked to choose labels for each of your plans. This is how you will distinguish them from each other for things like incoming calls or selecting the line you would like to use when placing calls or sending text messages.
Your current number will automatically be labeled Primary but you can change this as well if it makes more sense to use a different labeling system, such as Personal and Business. Don’t worry if you’re not sure which labels you want to use here, as you can change them at any time.
Step 8: Tap on the label you would like to change and select one of the predefined labels, or tap Custom Label and enter your own.
Step 9: After picking a label, tap Done.
Step 10: Repeat steps eight and nine if you would like to change the label for the other line.
Step 11: When you’re satisfied with your choices, tap Done to proceed.
Step 12: On the next screen, you’ll be asked to pick which of your two lines will be used for outgoing calls and messages. While you’ll be able to select a specific line on a per-call or per-contact basis, the one you select here will be what gets used by default.
Tap the line you would like to use as your default line, and then tap Continue.
Step 13: You’ll next need to select the numbers you want to use for iMessage and FaceTime. Note that this doesn’t affect which line your iPhone uses to actually send and receive data for these services; just like any other service on your iPhone, they’ll still use Wi-Fi or your default cellular data plan (which you’ll choose in the next step). All you’re doing here is deciding which of your numbers others will be able to reach you at over iMessage or FaceTime.
Select one or both lines, and tap Continue when you’re ready to proceed.
Step 14: The last step is to pick which plan you want to use for cellular data. The best choice to make here will depend on things like data rates, allocations, and coverage. Like everything else here, however, you can change this later, which you may need to if you’re setting up a second line to avoid roaming charges while traveling. Pick whatever plan is best for your present circumstances.
It’s also possible to use both plans for cellular data by tapping on the toggle beside Allow Cellular Data Switching. In this case, your iPhone will use whichever plan provides the best performance at any given time. However, this can make it trickier to manage your data usage, so we don’t recommend it unless you have high data caps on both plans.
Step 15: Once you’re happy with your Cellular Data selections, tap Done to finish setting up your second eSIM line.
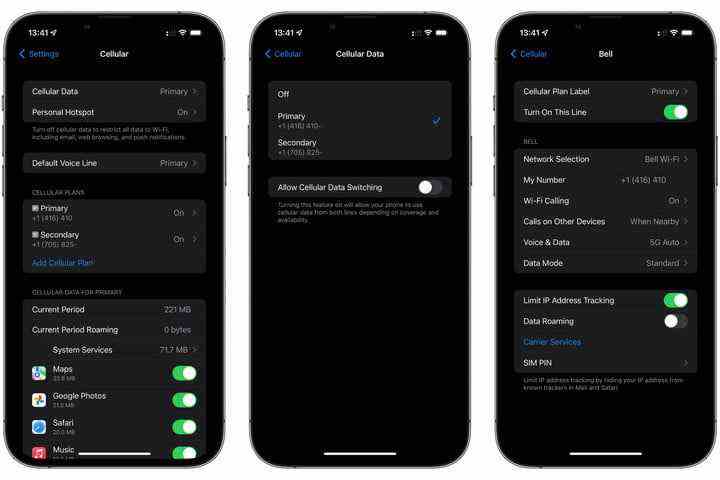
You’ll be returned to your Cellular settings screen, which will now look a bit different:
- Instead of a toggle, the Cellular Data option at the top will now show the label of the plan that’s currently being used.
- A new Default Voice Line option appears to let you choose which line your iPhone normally uses for outgoing calls and text messages.
- A new Cellular Plans section shows both of your individual lines. Tapping on these will take you to the settings for each plan, such as cellular data options for 5G and roaming, Wi-Fi calling, and Voice & Data.
- You may also notice that the cellular signal strength indicator in the status bar has changed slightly — it’s not split into two sections to let you see the signal strength for both of your lines at a glance. You can see more details by swiping down from the top-right to bring up the Control Center, which will show both of your lines with their carrier tags and network status.
How to identify incoming calls
Once your second line is up and running, you’ll be able to receive incoming calls on either line. Your iPhone will tag these with a small icon to let you know which line they’re coming in on.
This will normally be only the first letter of the label, such as “P” for Primary or “S” for Secondary. To avoid ambiguity between similar labels, however, it will use up to four letters for each. Beyond that, it will simply assign a number instead.
These icons will be shown not only on the incoming call screen, but also in the Recents and Voicemail lists in the Phone app.
Jesse Hollington / Digital Trends
How to choose a line for outgoing calls
Unless you specify otherwise, your default line will be used for outgoing calls, whether that’s to one of your contacts or you’re manually placing a call from the iPhone keypad. Here’s how to select your other line for an individual call:
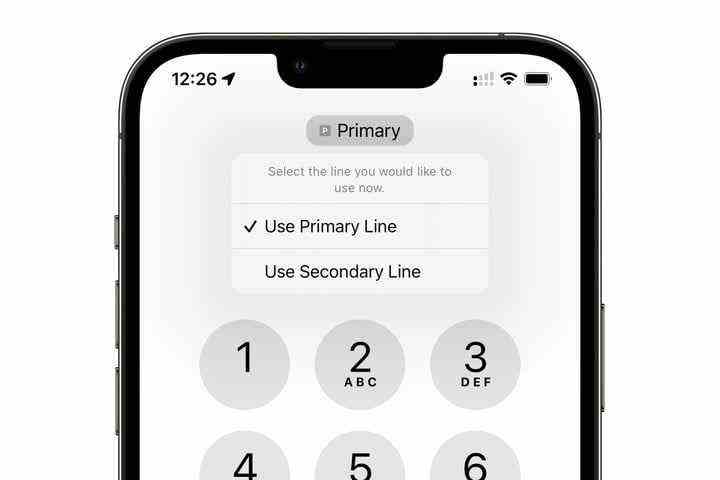
Step 1: Open the Phone app.
Step 2: At the bottom, tap Keypad.
Step 3: You should see the label for your default line at the top of the screen. Tap on it.
Step 4: From the pop-up menu that appears, choose the other line.
Step 5: Place your call normally. It will go out on the second line.
Unfortunately, you can’t do on-the-fly this when placing a call to a contact. You’ll either have to dial their number manually, or change the line that you’ve assigned to them. We’ll explain how to do that next.

Jesse Hollington / Digital Trends
How to assign a contact to a specific line
By default, calls to any of your contacts will use whichever line was most recently used with that contact. If you haven’t yet placed a call to them or received a call from them, the default line will be used instead.
However, you can also assign a specific line to any of your contacts. Once set, that line will always be used for outgoing calls to that person. This can be a handy way to separate lines for personal and business use. Here’s how:
Step 1: Open the Phone app.
Step 2: Tap the Contacts button at the bottom of the screen.
Step 3: Locate a contact you would like to assign a line to, and tap on their name.
Step 4: The current line will be shown beneath the contact’s name, with a prefix that indicates whether it’s the default line or the last used line.
Step 5: Tap on this line to bring up the Preferred Line selection.
Step 6: Last Used should be selected by default. If you would like to change this, tap on the line that you want to assign to this contact. If you’ve previously assigned a default line, you can also tap on Last Used to set it back to the default behavior.
Step 7: Tap Done when finished.
Note that this will affect the line used not only for placing phone calls to this contact, but also for sending text messages, starting iMessage conversations, and placing FaceTime calls with this person. To avoid confusion, existing conversations in the Messages app will continue using whatever number they started with, unless you specifically change them.

Jesse Hollington / Digital Trends
How to choose a line for text messages
When starting a new text message or iMessage conversation with one of your contacts, your iPhone will use the line assigned to that contact, as outlined in the previous section. However, you can also change this at any time — even for conversations that are already in progress. Here’s how:
Step 1: Open the Messages app on your iPhone.
Step 2: Tap the new message button in the top-right corner to open the New Message screen.
Step 3: Type in the contact name or phone number of the person you want to send a message to, and tap Return on the keyboard.
Step 4: A From line will appear below the address, showing the line that will be used to send the message. Tap on this line.
Step 5: Choose the other line from the pop-up menu that appears.
Step 6: Proceed to send your message as you normally would.
Jesse Hollington / Digital Trends
Step 7: A few things to note:
- You can use this method to change your number for conversations that are already in progress. Follow the steps above and enter the contact name or number for the existing conversation. You’ll see the conversation thread appear after tapping Return, but you’ll still be able to select an alternate line to continue the conversation.
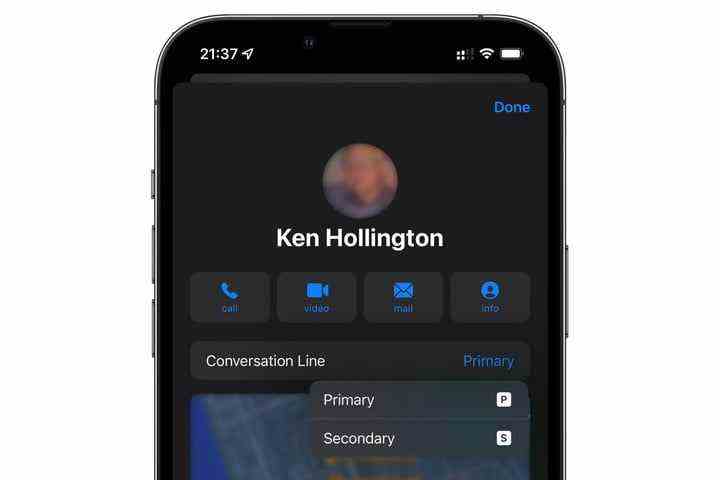
- A much easier way to change your line for a conversation in progress is to tap on the person’s name at the top of the conversation and select your alternate line from the Conversation Line button.
- When switching numbers in a conversation, a note will be posted to indicate the change.
- If you haven’t enabled iMessage on your second line, switching to that line will also switch your conversation to using green-bubbled SMS text messages. You can enable iMessage on your second line by going to Messages > Send & Receive in the iPhone Settings app.
Jesse Hollington / Digital Trends
How to disable a line temporarily
Just because you’ve added a second line doesn’t mean you always need to keep it active. The iPhone lets you switch off either of your lines whenever you like with a quick trip into the Settings app. This can be useful if you have a line you only need while traveling, or if you’d simply like to avoid being interrupted by business calls during your downtime. Sadly, the new Focus Mode in iOS 15 doesn’t yet allow you to block or allow calls on a per-line basis.
Step 1: Open the Settings app on your iPhone.
Step 2: Tap Cellular.
Step 3: Under Cellular Plans, tap the line you would like to disable.
Step 4: Tap the toggle beside Turn On This Line to turn it off.
Once disabled, all references to that line will be hidden from your iPhone. You’ll no longer see separate signal strength indicators, and even the line indicator icons beside your recent calls will vanish until you turn the line back on. Calls will still go to your voice mailbox if you have one, but they won’t get through to your iPhone. Disabling a line is the equivalent of removing the SIM card from your iPhone entirely.
Note that this isn’t confined only to your secondary eSIM line. If you prefer, you can disable your primary line and use only your secondary one. In fact, you can even disable both lines, in which case your iPhone will simply behave as it if it has no SIM card installed — right down to showing “No SIM” in the status bar.
How to remove your second line permanently
If you no longer need your secondary line, you can remove it from your iPhone in a few quick steps. Be aware, however, that this will not cancel your line with your carrier — you’ll still have to call them to do that, the same as you normally would.
Step 1: Open the Settings app on your iPhone.
Step 2: Tap Cellular.
Step 3: Under Cellular Plans, tap the line you would like to remove. Note that you can only remove an eSIM-provisioned line from here. To remove a line assigned to a physical SIM card, you simply need to take the SIM card out of your iPhone.
Step 4: Scroll down to the bottom of the settings and tap Remove Cellular Plan.
Step 5: Tap Remove [carrier name] Plan to confirm.
The plan will be removed from your iPhone. Note that you may have to contact your carrier if you want to set it up again, so don’t remove your line unless you’re really certain that you’re done with it.
How to move your physical SIM to an eSIM
If you would like to get away from using a physical SIM card entirely, many carriers will let you transfer your physical SIM card over to use the eSIM built into your iPhone instead.
While there’s not usually a reason to worry about this, it’s a good way to free up your physical SIM card slot if you’re planning to travel to another country, and you’re uncertain if the mobile operators there will be able to handle an eSIM.
Further, most iPhone 13 models support dual eSIM, allowing you to transfer your physical SIM card to an eSIM and still have another eSIM available for a second line.
Apple offers a simplified transfer process for folks on certain carriers. If this is available, a Convert to eSIM button should appear under Settings > Cellular. If this doesn’t show up, you may still be able to convert your physical SIM to an eSIM, but you’ll need to contact your carrier directly for instructions.
Editors’ Recommendations