vegetable garden
Prick out tomatoes: this is how you separate the tender young plants correctly
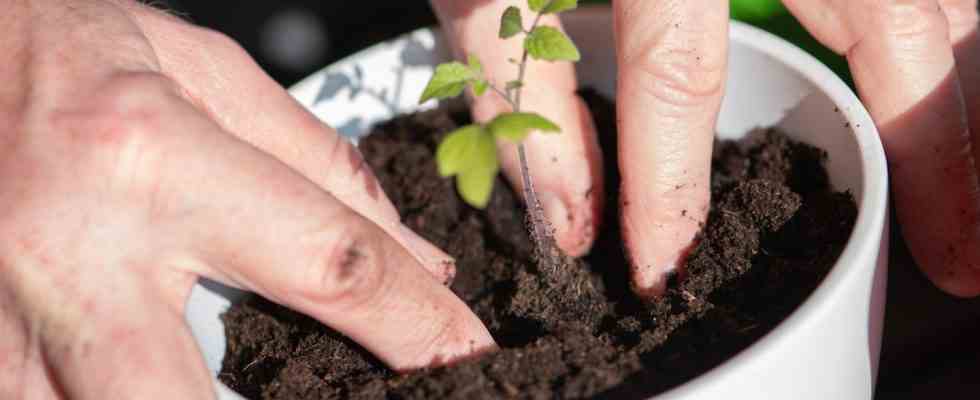
Tomatoes are one of the vegetables most commonly grown at home. Decisive for the success of the harvest: pricking out the young seedlings correctly.
© Andrea Warnecke / Picture Alliance

A little skill, a little patience, lots of water and a little bit of luck. That’s all it takes to successfully grow tomatoes on your own. The star explains why you should prick tomatoes and how to do it.
In nature, plants and animals usually clarify among themselves who has the right of the strongest. The gardener with a green thumb needs a little help with the tender seedlings of various vegetable plants. And at the right time. Also in your own interest. The weak or broken young plants are then sorted out, while the strong seedlings from the cramped offspring flat share are allowed to move into a slightly larger pot of their own. In the gardener’s language, the separation of the young plants is also referred to as “pricking out”. The term goes back to the French word “piquer” (in English: to stab) and originally referred to a military unit that attacked its enemies in close combat between the 15th and 17th centuries with a pike, a spear.
Pricking out is far less bloodthirsty these days. And yet it is decisive for how productive the vegetable harvest in your own garden or on the balcony is in summer. The star therefore explains when and how small tomato plants are best separated and what is important after pricking out.
Pricking tomatoes: when is the right time?
You don’t need a calendar or detailed knowledge to find out when tomato seedlings need to be singulated. A good eye is enough. Are the tomato seeds germinated in the seed trays, two cotyledons first form (in the case of dicots such as tomatoes and peppers). The first two real leaves follow just a few days later. Exactly then you can slowly start to relocate or prick out the seedlings. Usually that is three to five weeks after sowing. When cultivating on the windowsill at home, pricking out should take place between the beginning and middle of April (for all those who occasionally look at the calendar). If you have sown the seeds in so-called multi-pot pallets, you do not have to prick them out. They stay in the pots until you can plant the tomatoes.
What you need for pricking
Before the seedlings are transplanted, a sack should low-nutrient seed or herb soil ready. Plus some Clay or plastic pots at least four inches in diameter and a prick stick. Alternatively, a sharpened wooden stick, a spoon or something similar will do. The nutrient-poor soil is intended to force the plants to strengthen their roots for the time outdoors. In order to provide for themselves despite the shortage of nutrients, they have to branch out their root system in the soil accordingly. This will help them later when they grow up.
Important: The containers for the pricked tomatoes should be clean. Possible pathogens disrupt the development of the young plants, which are still very sensitive in the first few weeks.
If the new planters are prepared accordingly, the seedlings can move. To ensure that this happens as stress-free as possible, experts recommend removing each plant individually from the seed tray and repotting it. To do this, the substrate is first loosened a little with the pricking stick or a similar object. Then the young plant can be carefully removed from the ground. You can tell whether the seedling is healthy and well cared for by the white and strong roots. Brown, thin roots indicate that the plant has been watered too much. Your chances of survival are slim. They should be discarded in favor of healthy young plants.
You should pay attention to this when pricking tomatoes
- Do not snap off roots and stems
- Shorten overly long roots to about two centimeters
- Insert the seedling up to the base of the cotyledons
- Press gently with your fingers
- Water the plant immediately after transplanting (spray bottle)
- Take the pickled tomatoes out of direct sunlight first
Off to freedom! This is important
After pricking out, the young tomatoes are only one step away – usually three to four weeks – from moving to the fresh air. Because this is an extreme change, the plants should be acclimated to the outdoor air in the days before. To do this, place the pots with the plants in a shady spot in the garden or on the balcony for a few days. After that they are hardened and can finally be planted out in the wild or in the prepared bed. Depending on how high the plants have grown by then, a trellis or trellis is helpful.
Sources:gartenjournal.net; mein-schoener-garten.de, tomaten-welt.de; plantopedia.de
You might also be interested in:
This article contains so-called affiliate links. Further information are available here.