By overclocking your CPU, you can squeeze extra performance out of your PC without spending any money. Most processors have a little extra headroom, and if you know how to overclock your CPU, you can take advantage of it for higher frame rates in games, faster renders in Adobe Pro, and everything in between.
Although overclocking may seem scary, the reality is that it’s not too difficult and it doesn’t pose much of a risk if you know what you’re doing. In this guide, we’ll run you through the basics for Intel and AMD processors. Remember though, CPU overclocking is only half the battle for maximizing your PC’s performance. You can overclock memory, too.
A word of caution
When you overclock a processor, a couple of things happen. The chip runs hotter and uses more power. Both factors can lead to problems if you’re using the stock cooler supplied with the CPU. That doesn’t necessarily mean you can’t overclock, but your potential overclocking headroom is much lower than using a more advanced air or liquid cooling system in your PC.
You’re operating outside of the limits of your CPU when overclocking, which could lower its lifespan. After all, increased power and heat will degrade most PC components faster. That said, most moderate overclocks won’t impact the lifespan on your processor in any meaningful way.
If you want to overclock a laptop CPU, you’re probably out of luck. Few allow it, and fewer still possess the thermal headroom to make it viable. But even if you can, we caution against it for your first overclocking venture.
Finally, overclocking your CPU can void its warranty. AMD and Intel typically don’t cover overclocking, though they would be hard-pressed to prove overclocking killed your CPU — unless you pushed way too much voltage through the chip.
Motherboard manufacturers may or may not cover overclocking. If you’re concerned, check the warranty before trying.
Identify your CPU
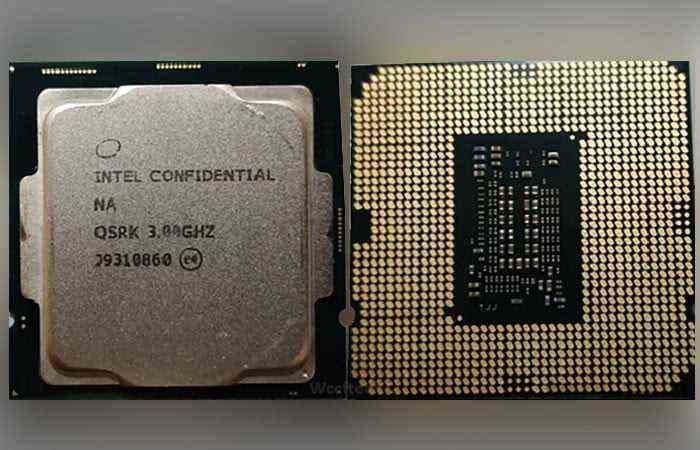
Before you start overclocking the CPU, figure out what you have — the chip may not even support overclocking in the first place. If it does, determine its theoretical maximums with a little research.
Which processors you can overclock is an area where AMD and Intel differ significantly. You can overclock the most recent Ryzen CPUs from AMD. Typically, you can only overclock the Intel K and X series CPUs.
Below are several recent unlocked Intel processors primed for overclocking. If your CPU isn’t on the list and doesn’t have a K or X suffix in its name, overclocking may not be possible. Double-check if you’re unsure.
| SKU | Base clock | Turbo clock |
| Core i9-11900K | 3.5GHz | 5.3GHz |
| Core i7-11700K | 3.6GHz | 5.0GHz |
| Core i5-11600K | 3.9GHz | 4.9GHz |
| Core i9-10900K | 3.7GHz | 5.3GHz |
| Core i7-10700K | 3.8GHz | 5.1GHz |
| Core i5-10600K | 4.1GHz | 4.8GHz |
AMD processors have remained completely unlocked and overclockable for generations. The last several generations of Ryzen CPUs support overclocking, including the recent Ryzen 5000 chips. Many FX-series processors support overclocking, too, if you’re still holding onto one.
If you’re not sure, don’t fret. The worst thing that can happen if you can’t overclock your CPU is that you try, and it doesn’t work. The software we recommend will tell you as such, so at worst, you’ll face some disappointment.
Housekeeping
Since overclocking increases your system’s operating temperature, it forces both your CPU and system cooling to work harder than usual. If this is your first overclocking attempt, give your PC a spring cleaning. You can clean the dust filters on your front intake fans or remove all hardware and wipe down every surface inside.
Ultimately, you want to make sure clumps of dust aren’t blocking air flowing in and out of your PC. Also, make sure dust doesn’t collect on your CPU cooler. That’s where the majority of the additional heat accumulates.
Before cleaning, turn off the PC and wear an anti-static wristband. We also don’t recommend using a vacuum cleaner to remove dust due to the potential for static buildup. If dust is hard to reach, use a can of compressed air.
When you’re finally ready, skip ahead to the section for the brand of CPU you have, and follow the instructions there.
Intel CPU: Extreme Tuning Utility
You can overclock Intel CPUs using the BIOS. Since this is a beginner’s guide to overclocking, we recommend Intel’s Windows-based Extreme Tuning Utility (XTU), which you can download here. It’s a free software suite explicitly designed to overclock your Intel CPU.
Unlike some third-party software, the Intel XTU is stable, reliable, and unlikely to cause problems independently. It gives you a detailed look at your CPU’s current state. Even if you’re not overclocking, it’s a great little utility providing loads of information about your system.
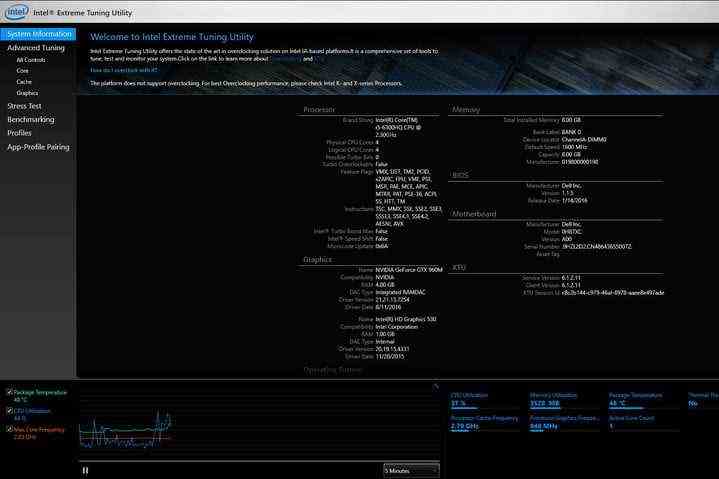
Intel XTU may look a little intimidating at first, given its many highly-granular options. But once you grow familiar with the tool, everything makes sense. The reams of information become highly useful.
Step 1: Baseline temperatures and performance
The first time you start XTU, take a few baseline readings to make sure your CPU is ready to overclock. Start by running Stress Test located on the left-hand menu. Run this test for at least an hour.
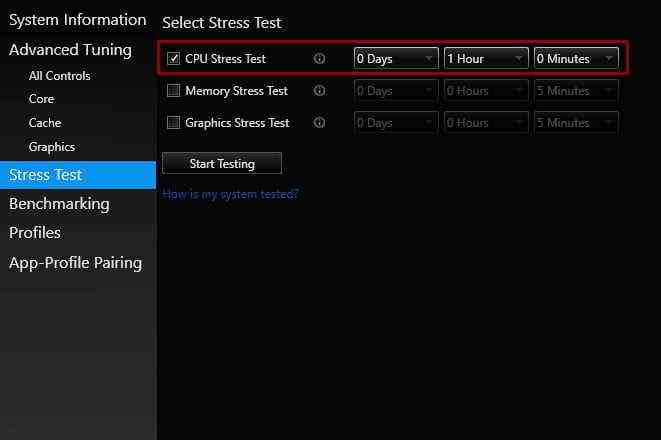
You can sit and watch the test or do something else. If you leave, return toward the end of the hour and look at the system information in the window’s base.
Take note of the Package Temperature. If your CPU is hotter than 80 degrees, you don’t have the thermal headroom to overclock. We recommend improving your cooling before continuing any further.
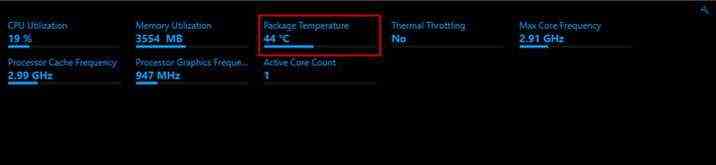
If your temperature is below that — preferably well under it — you have some thermal wiggle room to push your chip at a higher frequency (with relative safety).
Step 2: Multipliers
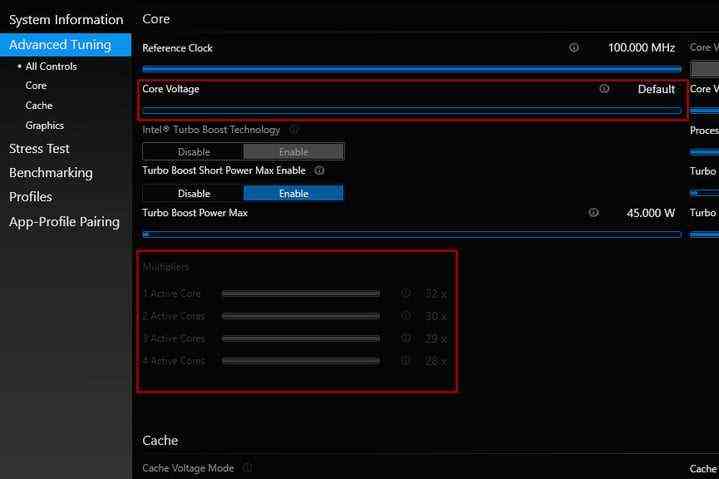
Although you can overclock your CPU using the Basic tab, learning about the different components of an overclock will help you better understand what’s happening with the chip. It also makes it easier to achieve a stable overclock. Select the Advanced Tuning tab from the left-hand menu and then look to the section headed Multipliers.
Multipliers (or CPU ratios) correspond to the speed you’re getting out of the CPU. It’s a multiplication of the BCLK frequency or reference clock. A x32 multiplier would typically mean a turbo frequency of 3.2GHz.
Raise your multiplier by one number (x33 in our example) across all cores. Although you can adjust frequencies individually on different cores, we’ll push for an all-core overclock to keep things simple.
Now test the overclock’s stability. Select Stress Test from the left-hand menu and rerun the test. In this case, you only need to run the test for 10 minutes. If it completes without a problem, increase the multiplier by another step. Rinse and repeat. Eventually, the test will report a fail result, or it will cause your computer to crash. When that happens, step back to the previous multiplier setting.
If you’re happy with the final overclock, run more extended stress tests and play a few games for several hours to the overclock remains stable. If not, reduce the multiplier another step and begin the stress testing process again. When you reach a point where you can happily use your PC as usual at a higher frequency, pat yourself on the back for a successful overclock!
If you run into difficulty trying to stabilize your overclock or want to see if you can push the system further, try adjusting its voltage.
Step 3: Core voltage
Many voltage parameters can affect a CPU’s operation, but arguably the most important and impactful is core voltage (VCore). You can adjust the voltage using Intel’s XTU, similar to how you changed the multipliers. This process can differentiate between unstable and stable overclocks, or even the difference between modest and much higher overclocks.
But be warned: You need to take more care when adjusting the CPU voltage than you do with multipliers. If you push the CPU to run at a ridiculously high multiplier, it will just crash and restart your system. If you try and force too much voltage through your CPU, it can kill it, so proceed with caution.
Use Google to see what settings other people use for your specific CPU, especially for VCore settings, given its potential to damage the chip. Reddit’s r/Overclocking is a great resource to see what other people generated from the same CPU configurations.
A general rule of thumb is that anything over 1.4 volts is dangerous. However, it is very much dependent on the particular chip in your PC, so additional research is worth considering.
When ready, select the Advanced Tuning tab in the left-hand menu of the XTU and increase your core voltage by about .025. For example, If you’re starting at 1.250, move to 1.275. Select Apply. If the system doesn’t crash, you can rerun the stress test to you’re still within a safe temperature range.
You can also try increasing the multiplier to see if the additional voltage improves your CPU’s overclocking ability.
Step 4: Tweak, test, repeat
At this point, you have all the tools for finding your CPU’s stable overclock. Take it steady. Change settings only in small increments. Run at least one short stress test after each change. Make sure your CPU temperatures do not exceed 80 degrees after a lengthy stress test. Finally, don’t set your voltages too high.
If your system crashes or restarts, that’s a telltale sign you’ve pushed something too far. Go back and make some adjustments. The most important outcome is that you find a safe and stable frequency for your CPU. It’s fun to push it to run at a much higher frequency, but if it’s not sturdy enough to run applications or play games without crashing, it’s not much use outside of bragging rights.
Once you’re happy with a stable frequency, take note of your settings so that you can reapply them later on if needed.
AMD: Ryzen Master

If you have a recent generation of AMD Ryzen CPU and want to overclock it with the least effort, you can use the ClockTuner automatic overclocking tool from 1usmus. If you want to learn how to do it manually, to help better understand what AMD overclocking is all about, follow the steps below.
AMD CPU overclocking is very much the same as Intel chips, but the software is different. If you have an AMD Ryzen processor from 2017 onward, the software we recommend for beginners is Ryzen Master. You can download the utility from AMD here.
For older AMD processors, we recommend AMD Overdrive instead. The following instructions still apply, but the software layout differs slightly. Make sure to double-check what you’re doing before making any changes.
Step 1: Stress test
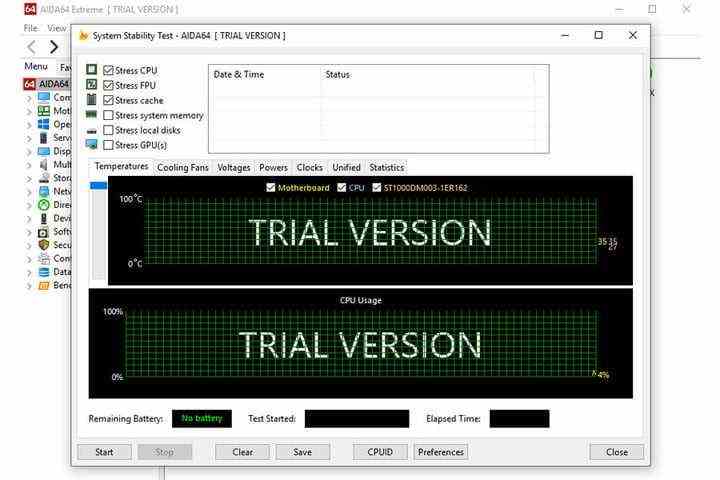
Before you begin overclocking the CPU, make sure that it won’t exceed safe temperatures. Although Ryzen Master has its built-in stress test, it doesn’t last very long. Instead, we recommend the AIDA64 Extreme tool and its stability test (free trial). If you like this tool, a full license costs $40, covering up to three PCs.
Open it and select Tools from the top menu, followed by Stability Test. Press Start when ready and leave your PC for around an hour. Make sure that at no point during testing do the temperatures exceed 80 degrees. If they do, improve your CPU cooling before trying to overclock. If you have some temperature headroom, move on to overclocking your system.
Step 2: Frequencies
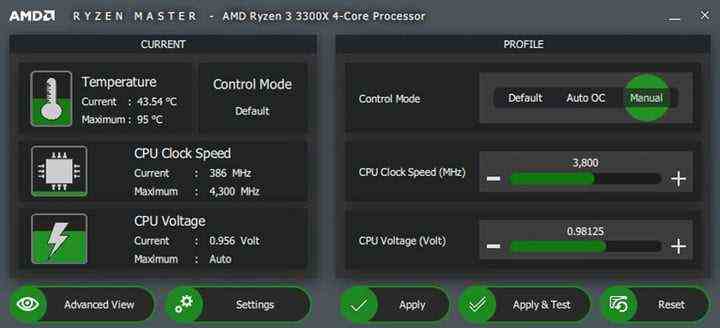
The latest Ryzen Master software is packed with options, the majority of which you don’t need for a basic overclock. To keep things simple, make sure you’re in the Basic View. If your software matches the screenshot above, you’re all set. If not, select Basic View from the bottom left corner of the expanded interface.
First, switch the Control Mode from Default to Manual. This will allow you to manually adjust clock speed and voltages, which you’ll need for the overclock.
Unlike the Intel software, you can adjust the clock speed directly instead of using a multiplier. Boost the CPU Clock Speed by 50MHz, then select Apply & Test. Ryzen Master will boost your processor’s frequency and test it. If your computer is stable and the temperatures aren’t too hot — again, the goal is to stay under 80 degrees — you can go through the same process again. Boost the clock speed by 50MHz, run a stress test, and verify that everything is cool and functional.
Ryzen Master’s built-in stress-testing utility is decent, but we recommend running a test through AIDA64 after you’ve reached the speed you want. Again, run the test for about an hour and pay close attention to your temperature.
Continue this process until you’ve reached the speed you want or you experience a crash. After that point, dial it back to the last stable setting and use your computer for several hours (or maybe even a day or two). If it crashes again, step it back again and test again. When it’s able to run all day while stressed, this is your base overclock, which you may be able to fine-tune for a little extra speed using voltage control.
Step 3: Voltage control
Increasing the CPU’s voltage can improve the stability of an overclock. It also allows you to overclock even further. The drawback is that it can dramatically increase temperatures. Pushing the voltage too high can damage your processor as well, so proceed with caution. Only make small adjustments at a time.
A safe voltage for most AMD CPUs shouldn’t exceed 1.4 volts, but we recommend researching your specific CPU to make sure you don’t set the voltage too high.
If you’re happy to take the risk, using the CPU Voltage section to push up your voltage by a .025 increment. After that, hit Apply & Test to make sure the system is stable, then go back and repeat the process. Keep an eye on your temperature here and make sure you don’t exceed 1.4 volts.
After you’ve reached a stable voltage, run an AIDA64 stress test for at least an hour, keeping an eye on temperatures.
Step 4: Rinse and repeat
Once you find a stable frequency and voltage, give yourself a pat on the back. Now you can increase frequencies further, provided you have additional headroom for voltage and temperature. Save your profile to lock in all these settings so you can use them in future sessions.
When Ryzen Master loads with Windows, it will prompt you to provide your admin approval to apply the overclock. You can start the app and manually apply the overclock if it doesn’t ask for your permission.
Editors’ Recommendations